Thursday, November 24, 2022
Monday, September 28, 2015
Thursday, September 10, 2015
The Milwaukee and Wisconsin News: Northern Pike
Friday, July 17, 2015

Monday, July 6, 2015
The Milwaukee and Wisconsin News: Musky Tackle Bag!!!!
Friday, June 26, 2015

The Milwaukee and Wisconsin News: Fishing Secrets 06 26 2015
Wednesday, May 20, 2015
Homemade hard baits


Wednesday, March 25, 2015
The Milwaukee and Wisconsin News: Humor: Fly Fishing is 03 25 2015
Monday, February 9, 2015
The Milwaukee and Wisconsin News: Musky Club of Wisconsin Newsletter 02 09 2015
Saturday, November 30, 2013
The Milwaukee and Wisconsin News: Musky Playing Cards
Tuesday, October 29, 2013
The Milwaukee and Wisconsin News: This is what I was just doing! 10 29 2013
Tuesday, July 23, 2013
The Milwaukee and Wisconsin News: Long Nosed Gar 07 22 2013
Friday, July 12, 2013
The Milwaukee and Wisconsin News: Fishing Secrets and This is a very good catch for ...
Monday, October 8, 2012
The Milwaukee and Wisconsin News: 36 Inches 13 Pounds The Milwaukee River
Thursday, August 23, 2012
The Milwaukee and Wisconsin News: Fishing Secrets Paint the bottom of your fishing g...
Friday, August 3, 2012
The Milwaukee and Wisconsin News: Fishing Secrets- The Sharp Spoon Stamped Edge 08 0...
Saturday, July 21, 2012
Wednesday, July 11, 2012

The Milwaukee and Wisconsin News: Musky Caught 07 11 2012
Monday, May 21, 2012
The Milwaukee and Wisconsin News: Home Made Musky Bait it floats high above the surf...
Friday, May 11, 2012
First Fish of the Season 05 11 2012

Thomas Paul Murphy
Monday, April 2, 2012
Tuesday, September 7, 2010
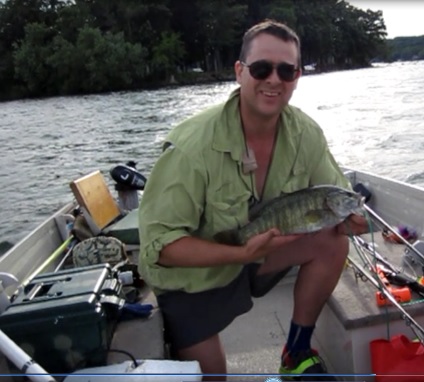
A catch and release at Cedar Creek 06 07 2010


Saturday, July 31, 2010
Fishing Log Items
Lake Fished: County:
Date: 10.09.2009
Time Left: Mileage to: Water Temperature:
Time Arrival:
Weather:
What Fishing For:
Bait Bought: Where Bought:
Structures Fished:
Type Fish Caught: When Caught: Lbs. Inches Long:
Bait Caught On:
#
Copyright 2010 Thomas Paul Murphy
Fishing From Shore Checklist
Fishing From Boat Checklist
Remember to Bring Fishing License and Size Limit Regulations Boat and Motor Specific Fishing Related Fresh gas and TCW3 2 cycle oil Fresh Depth Sounder Batteries Get boat lights and see if work, Fresh D batteries if needed Marker buoy Wooden stick and clamp to hold transducer Rope to hold motor Gas Tank and Lemon Line Life Vests Anchor and Rope: If going to a windblown lake consider Dan forth if have room Food and Drink Related Cooler with blue freezer inserts Hard boiled eggs and put in blue cooler Water in blue drinking container Lunch Bars Other Lunch Vitamin D & Kidney pills Colostrum drink in cooler Beta sistosterol and ZMA Natokinase and B12 Container with Gatorade Fishing Tackle Related String line on Rods: Can have 3 rods? 1. Casting rod wil have a jig head for soft plastic 2. Red Rod will have a slip sinker rig 3. Light spinning rod will have a slip bobber A leader for northern pike Stringer Multitool Yellow file Rods and reels Plastic bag or Bucket for Fish Jaw Spreaders Swivels Net Lures and Formula | Clothing Second set of Glasses besides polarized and glasses cleaning wipes Fingernail clippers Casting reel instructions Rain coat and all weather Gear Broad Rimmed Hat Vented Baseball Redhead Hat Maps and Navigation aids Lake Maps GPS Other Sunscreen Skeeter repellent Fully Charged Yellow Flashlight and Small Led Light Glasses cleaning swabs Microfiber Towel |
Sunday, May 23, 2010
My Big Fish


I thought I would share this catch with you. I caught this on July 7th 2008, casting of the pier, at Big Bay Park. I was using 10Lb Trilene XL, a ball bearing swivel, a Shimano Sedona 4000RB reel on a 9 ft Cabelas blue label fishing rod. This is the link to the lure I caught it on:
http://astore.amazon.com/thefishingstore-20/detail/B001T2GNPE
If you want to know the truth very few fish have been caught at this location since 1985. Some blame it on the shallow water being warm. I blame it on pollution. Anyway I caught this in the early morning before a storm of strong winds and rain blew through, and almost took me with it. The storm came from the west. This one was a rarity you can get some clue as to how big it was by the brown paper grocery bags. We ate it. :)
Thomas Paul Murphy
Copyright 2010 Thomas Paul Murphy
Monday, April 5, 2010
How to Make a French Spinner Introduction

French Spinners 04 05 2010
Before I present you with my much awaited series on how to tie a Musky Buck tail I want to show you how to make an easier spinner. I.e.: A wire spinner without hair. As a fisherman you know that a small difference in lure can make a big difference in fishing. This article will get you started with your own vision of lure engineering and design.
There are basically two steps to making one of these lures pictured above:
1. Selecting the components to place on the wire.
2. Bending and forming the eyelets.
Step One- The easy step
You pick the colors and styles to your own “taste” of choosing. And for those who don’t understand that phrasing this article is not for you, go spend your money on beer at the Regal Beagle and meet a new regret or count your pennies as you sit in mother Bates rocking chair. I usually buy mine from Barlow’s Tackle or Janns Netcraft for ease of selection. A nice store in the Milwaukee area is Reinke Brothers, 3144 W. Greenfield Ave., they are very helpful.
Copyright 2010 Thomas Paul Murphy
Wire Component

A. Single strand stainless steel wire. Always opt for the larger diameter when looking at the lists and thinking you should compare prices to diameter. I use “American Fishing Wire”‘s “Tooth Proof” 500LB, # 22, Stainless Steel Leader Wire.
Copyright 2010 Thomas Paul Murphy
Clevis

Clevis: This is the half circle part that holds the spinner blade to the wire. Get one of single piece and not a wrap around the wire type. It should have holes drilled in the ends and be big enough for the diameter of the wire you use.
Copyright 2010 Thomas Paul Murphy
Spinner Blades
Spinner Blades; these are French #5 spinner blades; they can also be used on Musky baits. (These Lures were made for Trout and Salmon, they could also be used for Musky.)
Copyright 2010 Thomas Paul Murpy
Lure Body

Lure Body: This is the part right behind the blade on the wire. It is usually metal beads or a barrel type. The metal beads are either hollow or solid. Solid are heavier but can balance the lure to the front which leads to it doubling back to the line when you cast, creating a fouled cast. Lure bodies are heavy too. I tend to prefer solid beads for added weight and I think they look better. Solid beads are counter weighted with a lead weight in front of the rear of the hook to balance the lure upon casting so it doesn’t “jack knife” to the line.
Copyright 2010 Thomas Paul Murphy
Lure Weight

Lure Weight: This is the weight in front of the hook. I started using steel weights because I don’t like the lead rubbing off on my fingers. It is a health hazard. The ones you see on these lure are ¼ oz and came from Cabelas. I like to drill the hole bigger where it fits over the eyelet to the hook; it stabilizes the lure and balances it better.
Copyright 2010 Thomas Paul Murphy
Treble Hooks
Hook: On these I used a size 2 Sohumi Hooks 203R Treble. On Musky baits I have gone to a size 8/0 treble. On hook sizing, if they have an 8/0 that means the hooks get bigger as the number goes up. If they don’t have the forward slash with the “aught?” after it means the hooks get smaller as the number goes up.
Step Two Eyelet Formation

Step Two: Step two is the much harder part because it requires manual strength with precision dexterity. It is an art to form them correctly. The goal is to get an eyelet round with end tangents directly centered to the wire. This allows it to run smooth in the water.
Tips to making the eyelet:
• It is easier to bend the wire closer to the “Stalk” wire if the piece you are bending to it is longer and you are bending from a distance where you are holding the pliers that is farther away from the eyelet, more leverage is created this way to form a tighter wrap to the wire.
• Don’t forget to put the hook on the bottom eyelet before you close it with a wrap of 1 ½ to 2 turns.
• Use one of those bull nose snipping pliers to snip the end. If there is still a bit sticking out bend it to the “axis” using two pliers and a fixation point method.
• Start by straightening your wire with a few friction strokes of your fingers, but don’t run them off the sharp tip end or you will cut yourself. The ends of cut wire are of spade or hoe formations. A more appropriate analogy is they look the front of a hammerhead shark.
• Don’t cut the wire too soon and start with more than you need or you risk a blade that won’t turn because the axle on the front of the spinner is destabilized from balance by hydroscopic force. You need some length in front of your spinner to balance it and resist this force. The principal here is similar to the woodworking principal measure once and cut twice except it’s more of a measured guess.
• More on bending the eyelet. When I first started making these 30 years ago I put a large framing nail in the vise and bent the wire around it to form the round part of the loop, while holding the two ends with vise grip pliers. Then to center the loop to the wire body you must put a slight bend in the other direction where the wire is to be wrapped around above it. Today I have bought a pair of needle nose pliers with round tips and they allow me to form these eyelets better. I wouldn’t want to go back to the nail in the vise method.
• On one of these lures above the spinner blade I have placed a crimping sleeve to keep the blade orientated to the back of the lure during casting and so that when it hits the waters it starts spinning faster because it does not have to take up the slack in the wire. I have not tried it yet and it might go through some variations and I have never seen this done before.
Copyright 2010 Thomas Paul Murphy
Tuesday, March 30, 2010
Caught at Oak Creek Today

Monday, February 15, 2010
Check back for a series on how to tie a Musky Bucktail Lure
How to weight your musky net.

How to weight your musky net.
If you are fishing alone and have to land a musky it can be a very demanding task to hold the rod in one hand and dip the net in very quickly to scoop the fish. Often the problems source arises from the fact that there is air resistance and water surface resistance when the net hits. Here is a successfully tested method I have used that allows me to net a fish with one hand from the boat using a large net.
1. Buy a can of insulating foam from your hardware store (Menards, Home Depot, Lowes, Ace, Etc.) Undo the cap on the net handle on both sides and spray this in. Use safety precautions, i.e. gloves, full face mask, old clothes etc. Put a piece of tape over the ends and poke a hole in it. This will allow air in to complete the curing. Also if your handle has a lock button be sure not to freeze it in place. After you take the tape off in a few days it may gooey out so be careful then too, it still needs more curing time. What this process does is gives the handle mass without significantly sacrificing buoyancy.
2. I also unscrewed the loop and ran a cable TV cable through it up to the screw holes. This allows you to have weight in the loop which helps break the surface and dive in deeper. But we are not finished yet because it is oddly weighted. We need something that works like using a Winchester rifle on a horse. And that’s the most important step 3.
3. Weight the handle pole by the back end tip. This allows you to use a balanced lever approach and makes it more maneuverable. To do this I duck taped a metal chisel or two (got from Harbor Freight) to the back of the handle. You can also use any heavy pipe scrap metal you can find. I had initially planned on fixing it inside the handle but never got that far. The secret to this step is to use just the right amount of weight at the back end of the net, an iterative decision process.
This makes for safer fishing also, and a quicker release. PS I cut the net to get a small musky out quicker and you should do this also. Net repair line and instructions are available for sale at Netcraft Inc. website. It’s not too hard to do and you can also weave a new net basket once you learn this also. If you make a net you will feel a sense of nostalgia or a connection to ancient fisherman. I guarantee it. With the latter suggestion you might make your misses jealous of your manly knitting craft.
Copyright 2010 Thomas Paul Murphy
Add weeds to minnow bucket
Keep minnows alive longer by adding some snagged weeds from your lure in the bucket with the minnows. It creates more of a natural environment for them and makes them more lively. Also make sure to follow your regulations regarding transporting bait and curbing the spread of invasive species.
Copyright 2010 Thomas Paul Murphy
QUICK RELEASE ANCHOR KNOT
08/27/2009
Quick Release Anchor Knot:
It helps to tie a quick release knot when anchoring frequently and tying off to depth. This knot greatly speeds up lifting and having it ready for the next place allowing you to move from spot to spot quicker.
Directions:
1. Form a loop from the desired section and run it through your bow eye.
2. Lap the loop under the sections from the anchor and from where you have the end tied off “permanently”.
3. Form another loop or ball from the section of your loop and put that ball in the loop created in step 2.
4. Synch this off tight so that you only have about six inches of loop that you pull to release the knot.
This knot ties quickly and releases easily because the doubled up strand has less friction to pull but enough material to hold fast and tight. It is helpful to keep the sections of rope straight when tying.
Test yours first before relying on it.
I doubt that I am the first one to use this knot, but did think of it myself. If it already has an origin or creator let me know and I will ask for permission and give them a byline.
Thomas Murphy